 |
EPlan LLC 695 Garden Valley Road Statesville, NC 28625
704-546-2703 (voice)
|
USER MANUAL
|
EPlan LLC 695 Garden Valley Road Statesville, NC 28625
704-546-2703 (voice)
|
Some screens may appear slightly different in your version of EPlan
EPlan was designed by emergency management professionals. We have been in the “trenches” just like you. We have been out there on chemical spills and doing damage assessment after a tornado or hurricane. We have managed the EOC when disaster strikes and we have been there when the budget is cut and you have nothing to work with and no time for training or to write plans. The “keep it simple” philosophy of EPlan was incorporated in the overall design. Documents and information are at your fingertips. It is difficult to be fully prepared for every disaster or catastrophic event, but solid emergency planning coupled with training can help you and your community be ready for most threats. Working with you, EPlan can help you do that.
Most emergency plans have hundreds of references. EPlan has them too. The difference is that EPlan takes you to that reference with the click of a button. Here are some of our features and why we think we are the best product on the market.
“The Emergency Plan”
o Easy to navigate, just click
o Easy to locate reference documents, just click
o Easy for the untrained to use, just click
o Roles and responsibilities of your EOC team
o Local demographics, local laws.
o This can become your plan and the work is done for you. You supply the information.
“The Mitigation Plan”
o Easy to navigate, just click
o References your concerns and your mitigation
o Describes your history
o What your plan is to help prevent or lessen the impact of disasters in your community.
“Operating procedures”
o Over a dozen procedures including those used for nuclear power plant events and exercises.
o Proven to work
o Easy to navigate, select the procedure, click and you are there
“Checklists”
o Dozens of checklists that cover natural and manmade hazards. Each includes actions for:
Planning
Response
Recovery
“Data base”
o Includes the things most emergency managers want:
Damage assessment
Resources
Resource requests and processing
Shelters and shelter population
Significant incidents
Personnel
“Links to important sites”
o Need more information, connect to the internet and just click. FEMA, Chemtrec, NOAA and more.
o There are links throughout EPlan to help guide you through the maze of information available to you.
o We do the research for you, locate the information and you simply click.
EPlan is simple, it is designed that way. It is easy to modify with some simple training and you can make changes as your needs change, and you can do the modifications, so your plan is updated when you want it to be.
EPlan will teach you all you need to know, in less than an hour, how to update and modify your plan. More importantly we will stand behind you, providing you updates, more checklists, more references, more links. It is all included in the purchase price. No hidden cost. We can simply email you the changes or you can go online and get them from the website. No more waiting on someone to deliver it to you. You can do the updates, no more waiting on a technician. Simple setups that run automatically.
EPlan is written with “off the shelf” software. No more hype from some computer whiz. We will tell you what it is and you can buy it at a local software store, or we can get it for you. Whichever is more cost effective for you.
Need additional Emergency Management work in your community? We can probably help you with that too. Our no obligation estimates will give you a budget figure you can work with. Tell us what you need, and then try us.
If you are not 100% satisfied with any product or service, you pay nothing.
EPlan LLC warrants its products to be free of defects in workmanship for a period of three (3) years from date of delivery to the original client.
EPlan LLC further warrants that customer satisfaction must be 100% and that customer has the right to return the product for full refund for a period up to and including ninety (90) days from date of delivery by EPlan LLC to the customer. EPlan LLC may request the customer to sign a satisfaction document. No reason for the return of product shall be required.
EPlan LLC does not warrant defects in workmanship for any third party software or hardware, nor does EPlan LLC warrant product suitability for the customer.
EPlan has been extensively tested with numerous computers, brands of computers, processor speeds, networks, network environments, internet and stand alone. Good performance can be achieved with the minimum specifications listed below.
Difficulty will be encountered with various functions of EPlan should the user decided to use software or computer hardware that falls below these minimums. Below minimums will cause the program to be slow and it some very rare cases, cease operation until the memory cache is cleared. Clearing memory cache or other systems issues must be resolved by contacting your System Administrator.
Intel Pentium III or higher
128Mb RAM (256 preferred)
Win98/2000/ME/NT/XP
50Mb free hard disk space
internet access
Internet Explorer 5.0 or higher
MS Office Professional 2000 (Access, Front Page, Power Point).- Not Included with EPlan
Getting started with EPlan is as simple as placing the licensed CD into the CD drive of the computer. EPlan is set to “autorun” the CD. Installation is automatically made to the required directories. Please do not attempt to make changes in the path or directory names, without consulting your system administrator. Path and or directory name changes may cause the software to operate improperly.

3. When requested, enter the serial number which can be found on the front of the EPlan CD and on the back of the original CD case.
EPlan recommends the use of IE5 or higher. Use of Netscape causes graphics to be off center and other features of EPlan cannot be used, such as collapsing menus.

EPlan operates just like a webpage. If you are familiar at all with the internet and using Internet Explorer 5.0 or higher, then navigating EPlan will be very simple for you.
Simply click on the menu item on the left you wish to go to.
If you are not familiar with Internet Explorer 5.0 or higher, please take a few moments to become familiar with the features of this powerful internet browser. If you do not already have Internet Explorer 5.0 or higher you may download a free copy directly from the internet by accessing the site: http://microsoft.com. Please notice there is no www in front of Microsoft. This is intentional. Microsoft changed its website address in 2002. Once you have reached the Microsoft site you can then select Downloads and choose the version of Internet Explorer you wish to download.
EPlan makes extensive use of the “Back” and “Forward” keys located in the Internet Explorer tool bar. Please become familiar with these keys.

EPlan also makes use of the “Minimize (-) Restore and Close (X) keys. Theses keys are located in the upper right hand corner of Internet Explorer.
Using these keys allows you to control the size of the browser, or to close it. This can become important in the Data Base section of EPlan and will be described in detail in that section of your Users Manual.
One of the most important features in understanding Internet Explorer is the built in Help (F1) feature. If you have questions regarding the use of Internet Explorer features, EPlan recommends using the Help key. Look for the Help key (or button) on the standard “toolbar” of Internet Explorer.
EPlan makes extensive use of something called “hyperlinks”. Hyperlinks can be thought of as nothing more than direct shortcuts to places you want to go. In some cases these links will take you to a place in a document. Others may take you directly to another document entirely; still others may take you to documents on the internet. It is very important to use all of the features and all of the hyperlinks available to you in EPlan you must be connected to the internet.
Editing documents is briefly discussed in this manual. Editing should be reserved for Administrators and others that have been given privileges by your agency to do this. Who has or does not have editing privileges is a matter of internal policy of your agency, company, or department and not EPlan.

Using
the EPlan Menu is as simple as using your mouse, placing the cursor over the
“button” on the menu and then clicking on the “button” on the menu (i.e.:
example on the left), for the item you wish to see. A single click is all you
need, but if you double click, that is OK too.
Your menu may appear different on your version of EPlan. This was a choice of your system administrator. Other menus may have titles and not “buttons”.
Each menu and each “main” page was customized to your agency’s requirements or requests.
The Emergency Plan menu of your program is also a matter of choice of your system administrator or program manager that selected the type of menu that would be used. Choices are an "expanding", “collapsing” and a “non-collapsing” menu.
For the purpose of illustration the collapsing menu is used here as an example.

Click on the Procedures “button” on the main page and you will be taken to a sub-menu for Procedures. While your Procedures Menu may look slightly different, the process is the same regardless. See the example below.
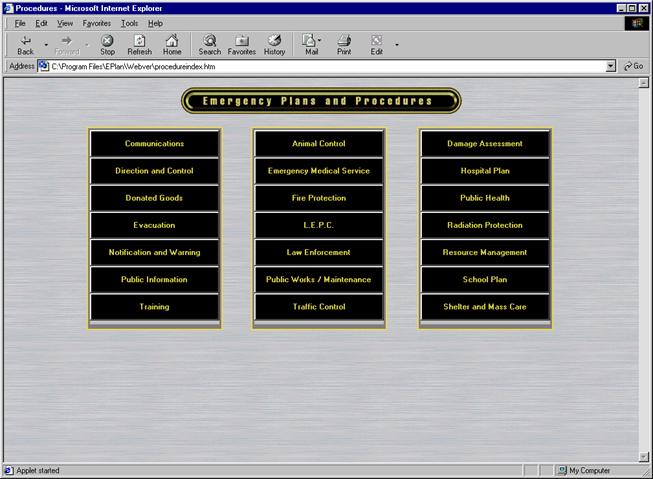
Once you have done this you will be taken to the actual procedure you have selected. In the Procedure there may be hyperlinks to other documents or web sites.
Because some procedures are lengthy and would take a great deal of time to thoroughly read, some procedures are indexed for your convenience and to make information that is most often sought, available with just a click.
Procedures that are reasonably short are not indexed and you will need to scroll up or down. In any case you can scroll on any procedure, whether it is indexed or not.
Remember you can use the “Back” and “Forward” keys on Internet Explorer, just as you can with any web page.
Using
the Mitigation Plan Menu
(only applies if Mitigation plan has been included)
The Mitigation Plan menu of your program is also a matter of choice of your system administrator or program manager that selected the type of menu that would be used. Choices are a “collapsing” menu and a “non-collapsing” menu.
For the purpose of illustration the non-expanding menu is used here as an example.
Click on the Checklists “button” on the main page and you will be taken to a sub-menu for the Checklist Menu. While your Checklist Menu may look slightly different, the process is the same regardless. See the example below.
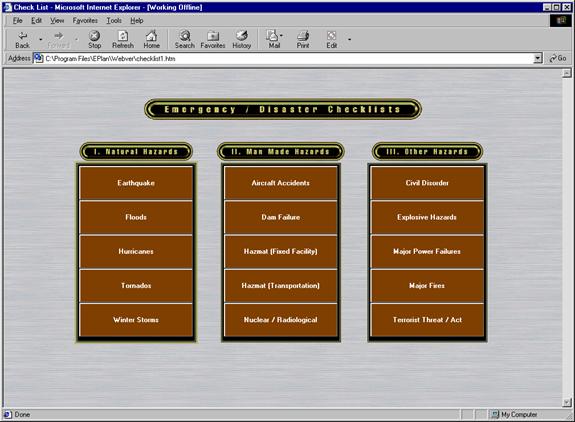
1. Read the menu and make your selection.
2.
Using your mouse, place your cursor over the word or words (i.e.: Floods) and
click.
3. The selection is made and you are presented a checklist for that subject.
Each checklist has at least three sections:
Planning
Response
Recovery
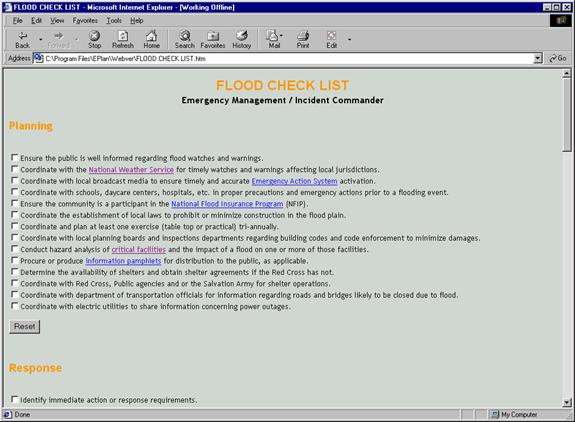
Checklists have a checkbox beside each item to be completed.
Each checklist also has links to other areas of plans, procedures or even the internet.
Each checklist also has a link to another form known as an IAP or incident action plan. This link to the IAP is found in the response section of the checklist.
The IAP can be filled out, and then printed as your needs during a disaster change.
Click on the Data Base “button” on the main page and you will be taken to a sub-menu for the Data Base. Remember, you also have the option of selection of database items from the main menu. While your Data Base menu may look slightly different, the process is the same regardless. See the example below. The Data Base works differently than any other function of EPlan. It assumes you want to do one of several things. At very least, it assumes you want to do one of the following:

Once you have done this you will be taken to the actual data base you have selected. In the data base there are numerous choices for you to make. Let’s look at each one separately.
Entering data (or information) into the data base is simple and straight forward. Lets look at the example of “Damage Assessment – Business”.
Click on Damage Assessment – Business. A sub-menu opens like this:
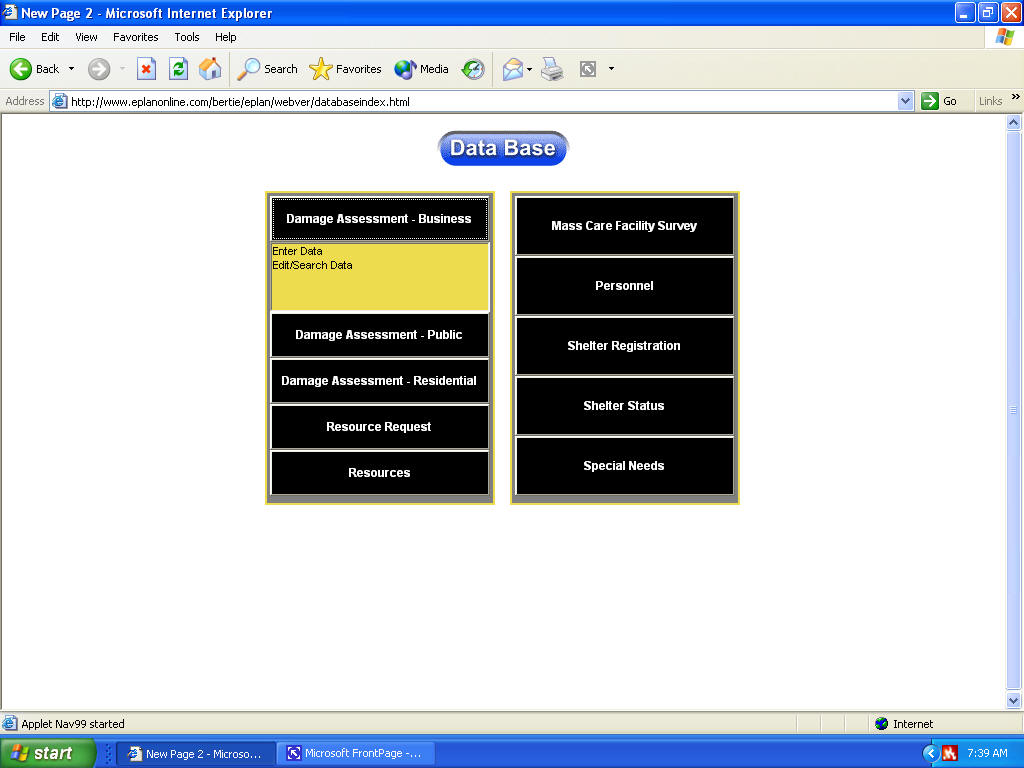
Choose Enter Data by positioning your cursor on Enter Data, now click and a data entry form will appear that looks like this:
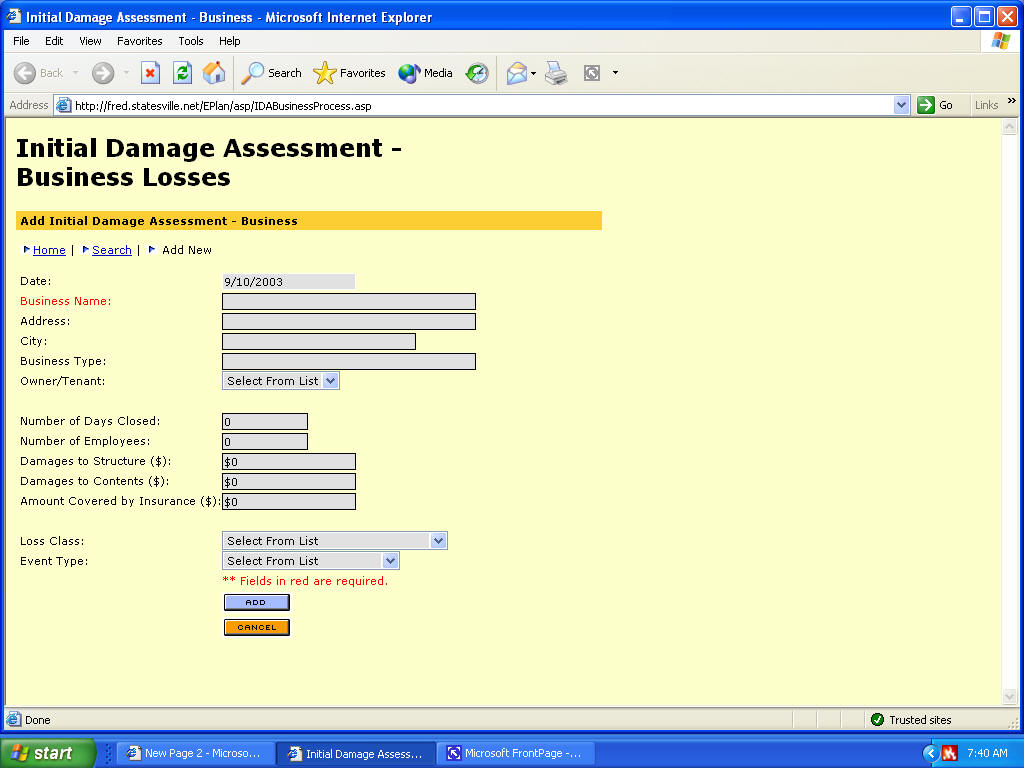
You may now type information onto the form. The “rules” about how you enter information such as using upper and lower case letters or all upper case letters is left to your System Administrator or supervisor. EPlan suggests using upper and lower case letters, as if you were typing any other document. It simply looks more professional.
Notice you can use the “tab” key to advance to the next data area, except when you reach a “pull down” menu. Pull down menus require that you use the mouse to make your selection.
When you have finished all of the data you wish to enter, look on the lower portion of the screen for a button that looks like this:
![]()
Then click on the button to add your data. You have just saved the record.
If you wish to enter additional records, you may do so now without returning to the menu. Simply click on "Add New" and a new entry screen will appear.
This will then display a “blank” data entry form, just like the one you just filled out. You can add records, as just described or “redo” an entry. All from the tool bar on your data entry form.
When you are finished, simply close the data entry form, using the Home key.
Notice when a data base screen is open that it appears in front of the “Menu screen”. This is perfectly normal. From this type of menu, EPlan data base forms of all types are designed so the user can access multiple screens at the same time and even move them separately if they have a large screen projector or another monitor attached to their computer. This arrangement can be changed if the System Administrator desires it.
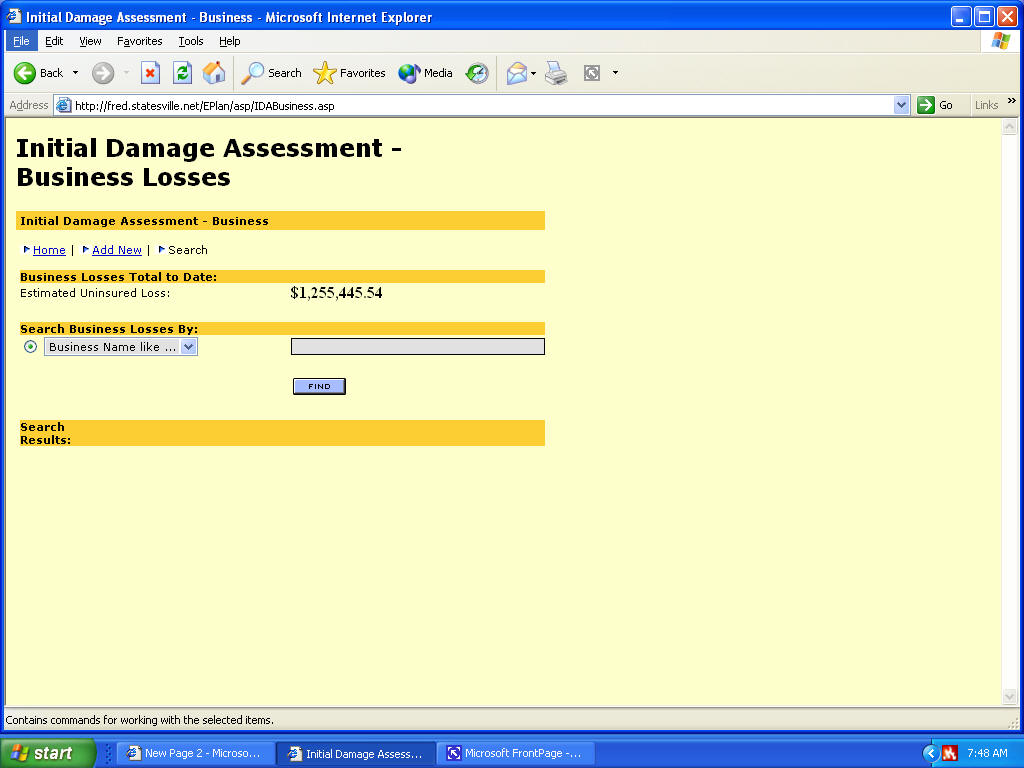
Edit/Search data:
Each data form in EPlan has been designed for ease of operation.
The information will then be broken down into (in this case) by a name, such as a business name. To search for a business, simply enter the name of the business and then click find. The Search (built in) function of the data base will even search for names that "sound like" or even on partial spelling.
Additionally, you can also choose to "see all". See All is ideal for printing reports.
Notice also that the “math” from the data entry form has been performed for you. This is another feature of EPlan to make the use of the program easier for you. Math or other calculations are made by the database and imported directly into the form so you do not have to have a calculator to perform math or other functions that would take time.
Another type of search requires the Name of a person or perhaps a position. Lets look at Personnel. Personnel is a bit unique in that we do not often care what a persons position is. We may not know what position they hold, but we do know their name. We at least know their last name.
On the Personnel selection of the Data Base menu, select, using your mouse (through the pull down menu) Search Personnel by Name, then click.
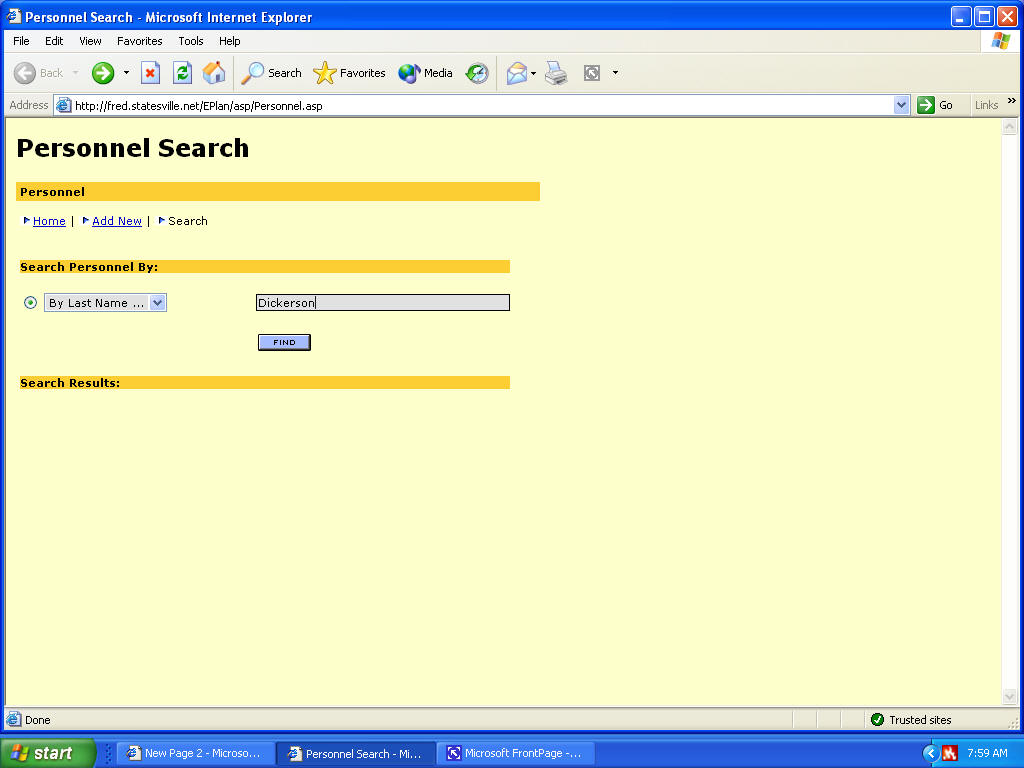
Then select the name from the list that appears.

And the data is presented to you. If you have been given privileges to do so, you may now edit or update this record.

IF no data is found EPlan returns a "no results found" screen. This is how you will know that the information is not on file. This is true for all data base search forms!
Unique Functions in Data Entry and Search/Edit
Both data entry and search/edit screens have several functions that are important to you. These functions help you to navigate records, find unique records, find records that are like what you are searching for and more. Here we will explore several options and short cuts.
1. Home
Home is perhaps one of the most important keys you will have on the data screens. Simply using the "back" key does not work very well. The reason is simple. Security. There are numerous security features built in to EPlan. This is one of them. It makes your data more secure and "challenges" someone that may wish to tamper with your data from an outside source. When you have finished entering or searching or editing data, simply click on Home to be taken back to the main menu.
2. Search
Even from a data entry screen you can search for a record. This function is available on all Enter Data screens. This function is there only for your convenience. If you are in the middle of entering information it is not recommended that you begin a search. Doing this will cause you to loose the information you have already entered.
3. Add
Add means the same thing as save. To add or save a record simply click Add.
4. Cancel
To cancel the record (thus not adding or saving it) simply click cancel.
5. Delete
If you have been given privileges to do so, from any record that has been retrieved from a Search/Edit screen you may delete a single record. Administrators may delete all records in certain tables.
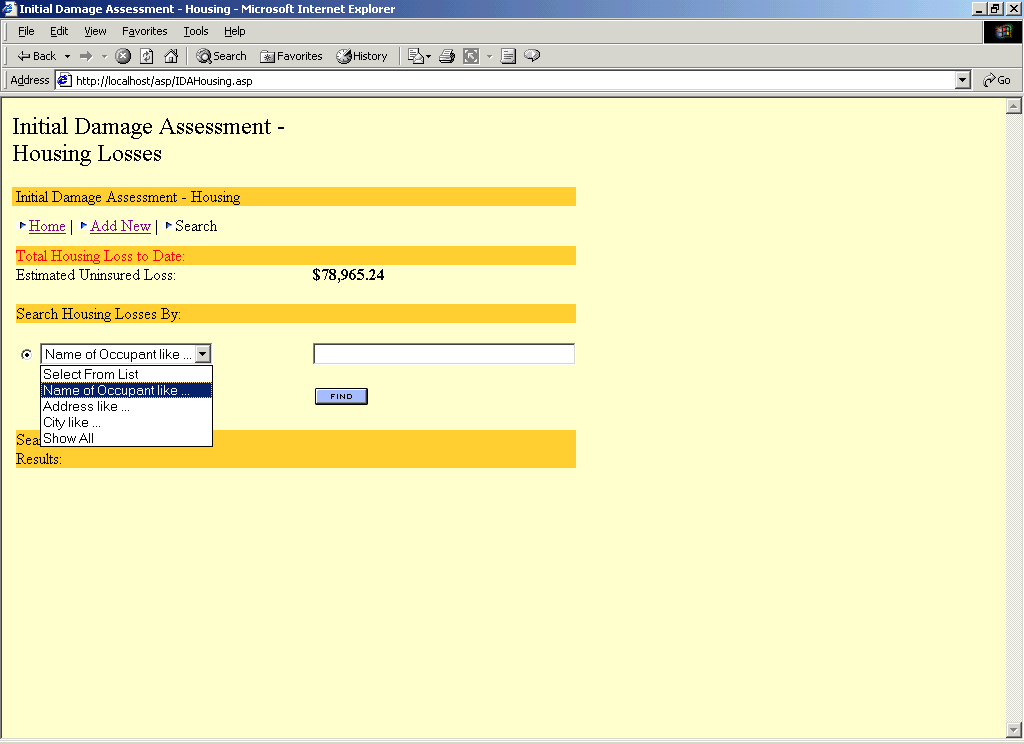
6. Search by:
Search by gives you numerous options on how to search for data. In the example below we have used the Search/Edit function for Damage Assessment - Residential
Notice the small "pull down menu" on the left, under Search Housing Losses By: In this case you can search by choosing:
Name of Occupant like... (the last name of a person)
Address like...
City like...
Show All... (this shows all
listings regardless of name, address or city)
7. Automatic calculations
Eplan's database does a lot of automatic calculations. When you enter figures in damage assessment (as an example) the totals are calculated for you when you add the record and the new total of all records is displayed. This is done to anticipate that there will be numerous users entering data at the same time through a network or via the internet.
When you delete records or edit records these calculations are also automatically performed for you. The new totals will be posted as you edit or delete records.
8. Spell check
There is not one. What you enter, the way you enter it, is how the computer will store the information.
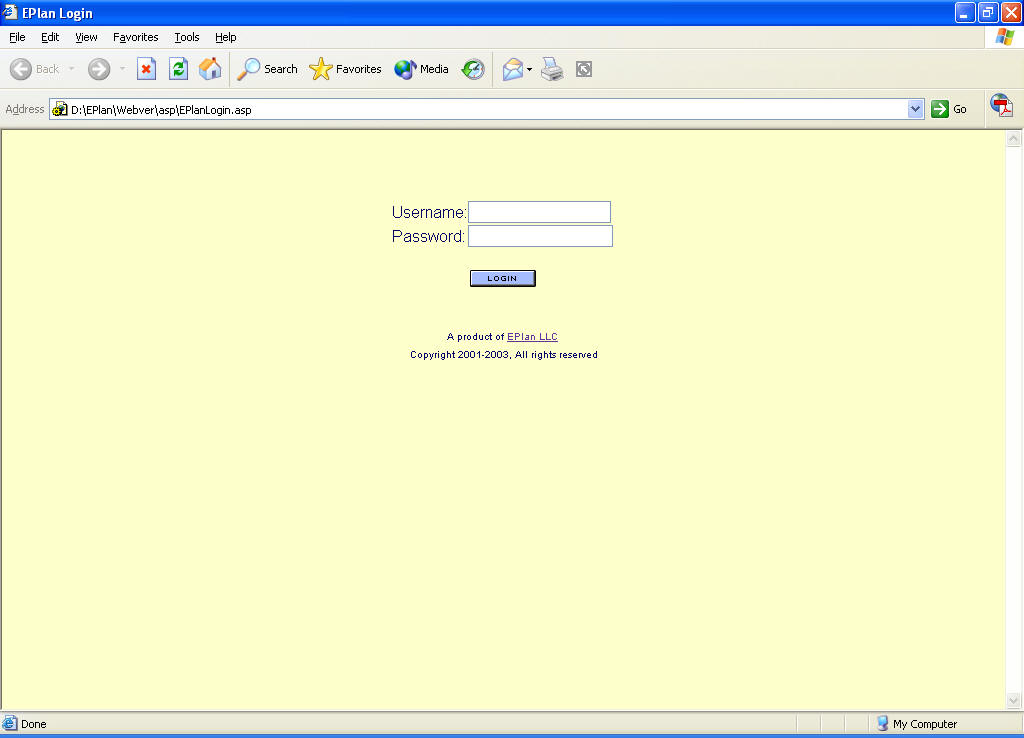
By now you are familiar with the login screen. This log in requires your user name and password. This is for security reasons. Please do not share your unique user name and password with anyone. The name and password you use have privileges attached to them. Compromising the use of user names and passwords compromises your security.
There may be times when it is necessary for you to log out of EPlan and not log
off your computer entirely. Going off duty is one example. You can log out so a
new user can log in and use their user name and password. To log out, simply go
to the main menu and click on the Log Out button, usually found in the lower
left of your main menu screen. It looks similar to this:
![]()
The Search function of EPlan is a “keyword” search function. What this means is that you can search for keywords such as tornado, county, emergency or any similar keyword. There are over 1,500 keywords. You can even combine keywords such as emergency AND management.

Type the word or words you wish to search for in the blank space, as shown above.
Then click Start.
Assuming the search function finds a keyword it will return a list of documents, along with the percentage of probability that the word is found within a document.
Click on the highlighted word.
NOTE: By clicking on the highlighted keyword in the Keywords column you will be taken directly to that document. The search function does not take you to the keyword in that document, it simply takes you to the document where the word can be found
Once you have found the specific document the word or phrase can be found easily by doing the following:

This is an Internet Explorer function and not a function of EPlan.
Links operates just like any web page site would. Simply clicking on the link name will take you to the website, assuming you are connected to the internet. EPlan recommends connecting to the internet when you first start the program.
If you have questions about EPlan or a function of EPlan, please call or email. If your need is urgent call or page EPlan.
EPlan LLC
695 Garden Valley Road
Statesville, NC 28625
704-546-2703 (voice/fax)
704-832-0208 (pager)
eplanllc@aol.com (email)